- Asia eSIM
- Middle East eSIM
- Europe eSIM
- America eSIM
- Oceania eSIM
- Africa eSIM
-
Global & Regional eSIM
- Global eSIM 43-country
- Global eSIM 84-country
- Global eSIM 108-country
- Global eSIM 145-country
- Global eSIM 148-country
- Asia 10-country eSIM
- Asia 31-country eSIM
- Europe 35-country eSIM
- Europe 40-country eSIM
- South America 12-country & Caribbean
- South America 28-country & Caribbean
- Africa 20-country eSIM
- Africa 26-country eSIM
Israel eSIM 5 days highspeed 4G/LTE
From: $4.50
- 5-day use
- 1GB-50GB data: at highspeed 4G/ LTE
- Voice call: not available
- Text message: not available
- Pay and get your eSIM instantly online
- Full instruction attached to your email
- 24 hour customer support
- Guaranteed refunding if eSIMs didn’t work
Read Before Purchase:
- You will receive a QR code but not a physical sim card. We deliver the eSIM to your email.
- To use the eSIM your device must be carrier-unlocked and compatible with eSIM. If you are in doubt, please check the eSIM supported phone list here.
General Information
Get connected to the Internet in Israel at 4G / LTE speed with a Israel travel eSIM. It’s easy and cheap! With the eSIM, you will call all your friends and family using WhatsApp, Viber, Telegram or iMessage, without restrictions. At the same time, you can keep your local SIM card to receive SMS and important calls.
Israel Travel eSIM is easy to set up: after purchasing, you will receive a QR code immediately in your email. Scan it with your cellphone camera, and in a few minutes, you’re connected to the internet.
Israel Travel eSIM plan
- 5-day use
- 1GB-50GB data: at highspeed 4G/ LTE
- Voice call: not available
- Text message: not available
Technical Specifications
- Network: Israel – Hot Mobile Israel, Israel – Pelephone Israel, Israel – Partner Israel
- Speed: 4G/ LTE
- Tethering / Hotspot: Yes
- APN: plus
- Analog calls: No, only through apps (VOIP).
- Text message: No, only through apps (VOIP).
- Activation: Automatic, activated when connected to a cellular network.
- Compatibility: all smartphones with eSIM enabled technology. Functionality on smartwatches and tablets is not guaranteed.
Israel Travel eSIM’s Coverage
Coverage: Albania, Austria, Belgium, Bulgaria, Croatia, Cyprus, Czech Republic, Denmark, Estonia, Finland, France, Greece, Hungary, Iceland, Ireland, Israel, Italy, Latvia, Liechtenstein, Lithuania, Luxembourg, Malta, Moldova, Netherlands, Norway, Poland, Portugal, Romania, Slovakia, Slovenia, Spain, Sweden, Switzerland, Turkey, Ukraine, United Kingdom, Uzbekistan, San Marino, Holy See (Vatican City State), Germany
This eSIM is working in multi-destination, so you will have internet access in all applied destinations. In case you move between these countries in the same travel, the usage of data and voice calls are accumulated equally at all destinations.
1. eSIM on iPhones
Add an eSIM
Settings > Cellular/Mobile data> Add eSIM/ Add Data plan.
Install the eSIM via QR code
Scan the QR code that you receive in your email.
Name your eSIM
Once the eSIM has been added, you can choose
a name to help you identify it (we recommend:
eSIM – #Destination, for instance: eSIM-USA).
Set the eSIM for Cellular Data/ Mobile data/
Settings > Celllar > Cellular data, select your eSIM
you’ve installed.
Turn on Data Roaming of the eSIM
Settings > Cellular > Select the eSIM > turn on Data roaming.
Check if you need to change your APN Settings
Changing your APN allows you to access mobile data. Some phones don’t start auto-set up of the APN, so you need to make it manually. The APN details are given to you along with the eSIM QR code on your email.
-
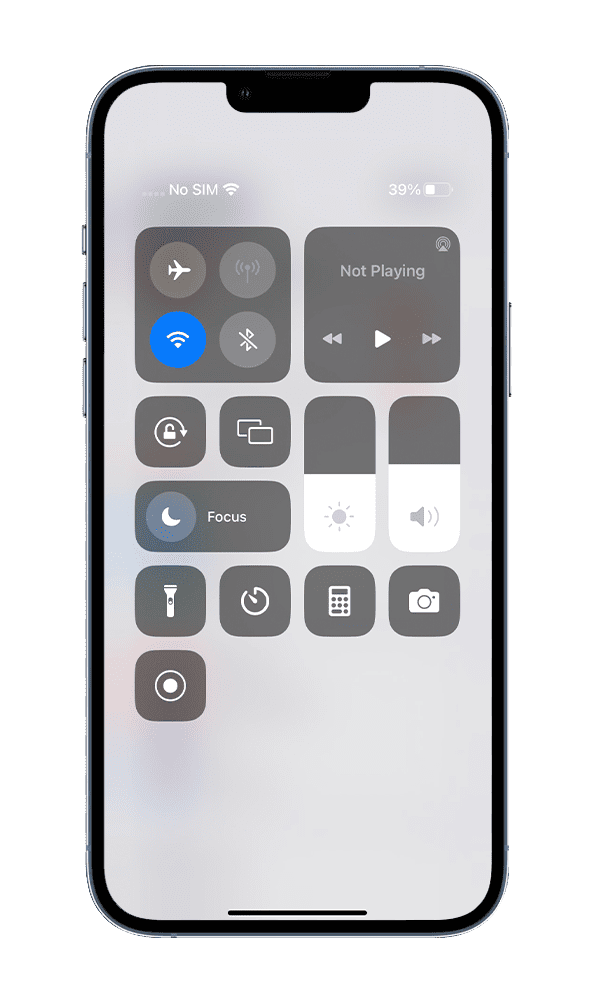
Step 1: Connect to Wifi or 4G
-
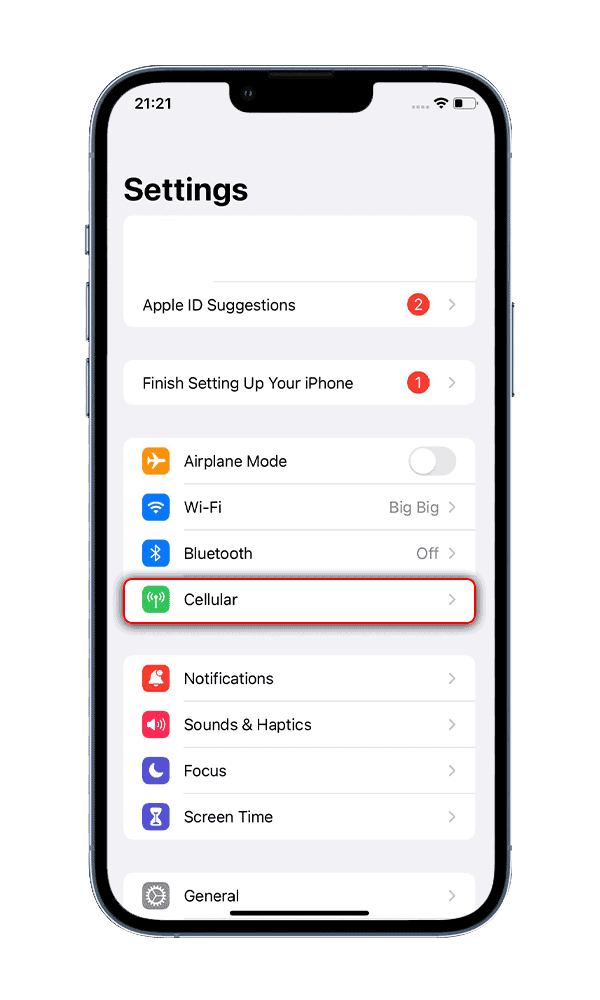
Step 2: Go Settings and select Cellular
-
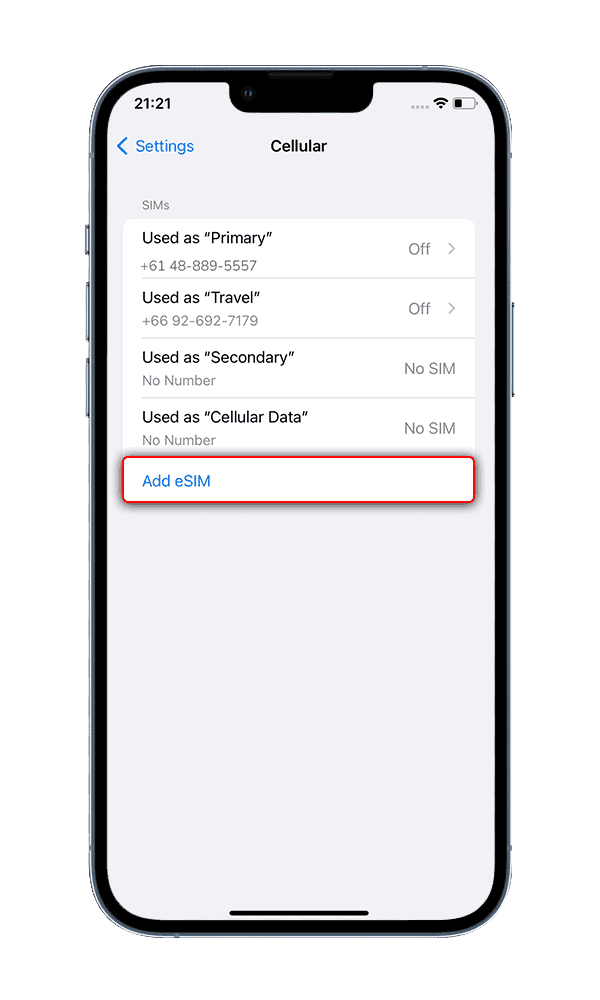
Step 3: Select Add eSIM
-
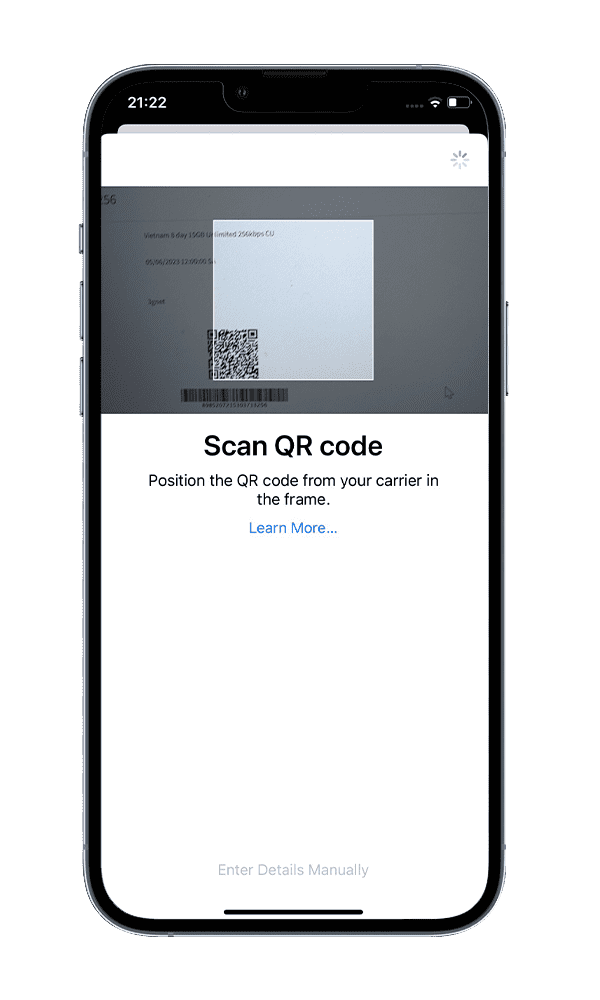
Step 4: Scan the QR code & label it as eSIM1 (or any other name)
-
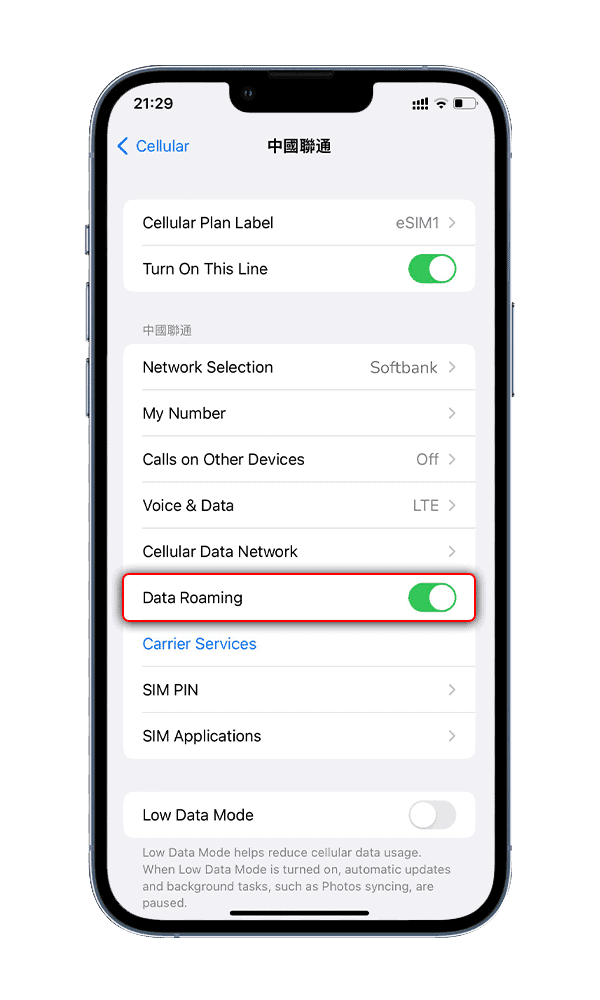
Step 5: Turn on Data roaming of eSIM1
-
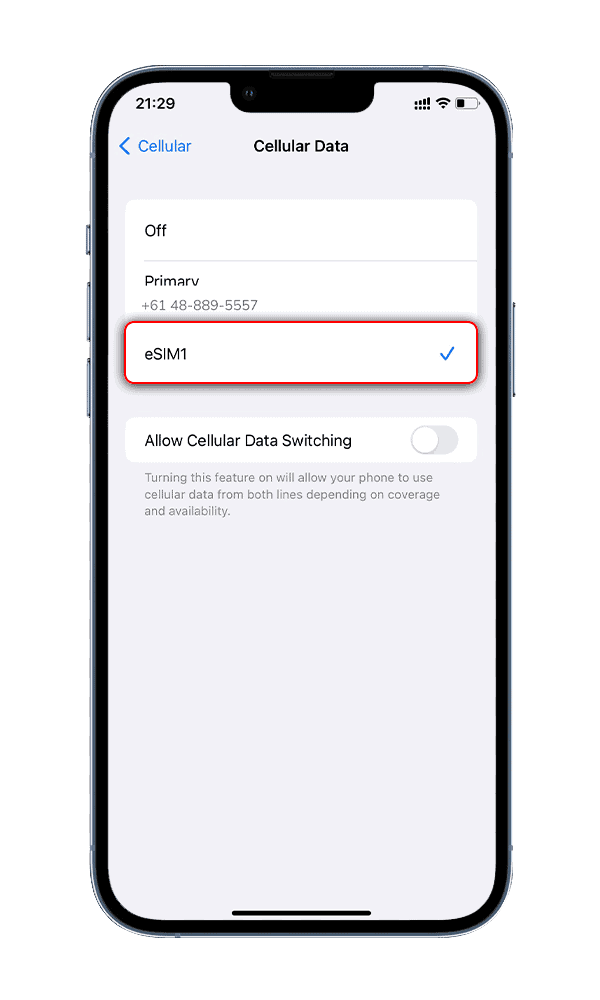
Step 6: Go to Cellular data & select eSIM1
![]()
2. eSIM on SAMSUMG
Add an eSIM
Settings > Connections > SIM Manager > Add Mobile plan.
Install the eSIM via QR code
Scan the QR code that you receive in your email.
Name your eSIM
Once the eSIM has been added, you can choose
a name to help you identify it (we recommend:
eSIM – #Destination, for instance: eSIM-USA).
Set the eSIM for Mobile data
Settings > Connections > SIM Manager
> Mobile Data > Select eSIM
Turn on Data Roaming of the eSIM
Settings > Connections > Mobile networks
> Turn on Data roaming.
Check if you need to change your APN Settings
Changing your APN allows you to access mobile data. Some phones don’t start auto-set up of the APN,
so you need to make it manually. The APN details are given to you along with the eSIM QR code on your email.
-
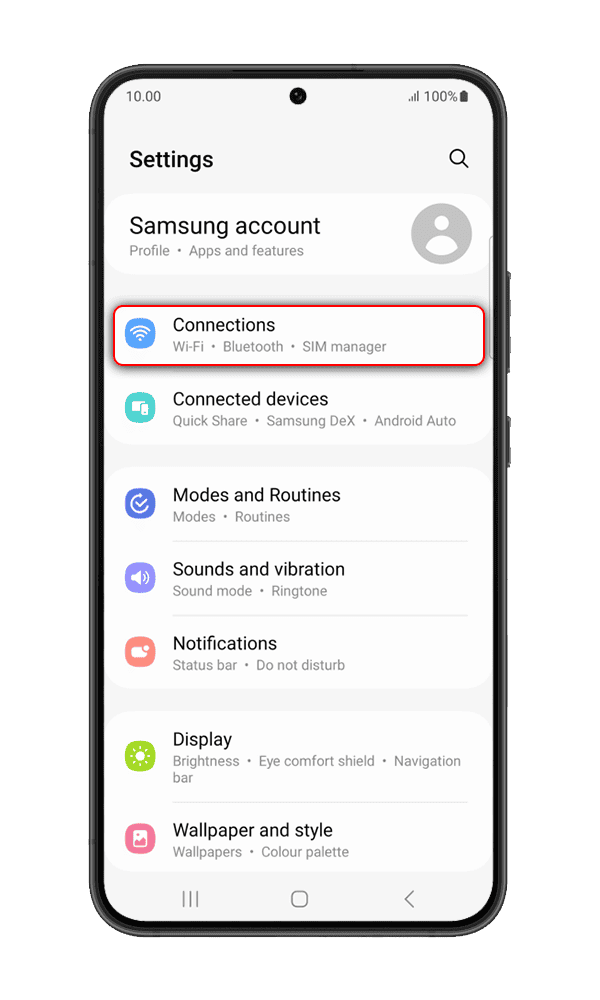
Step 1: Go to Settings > Connections
-
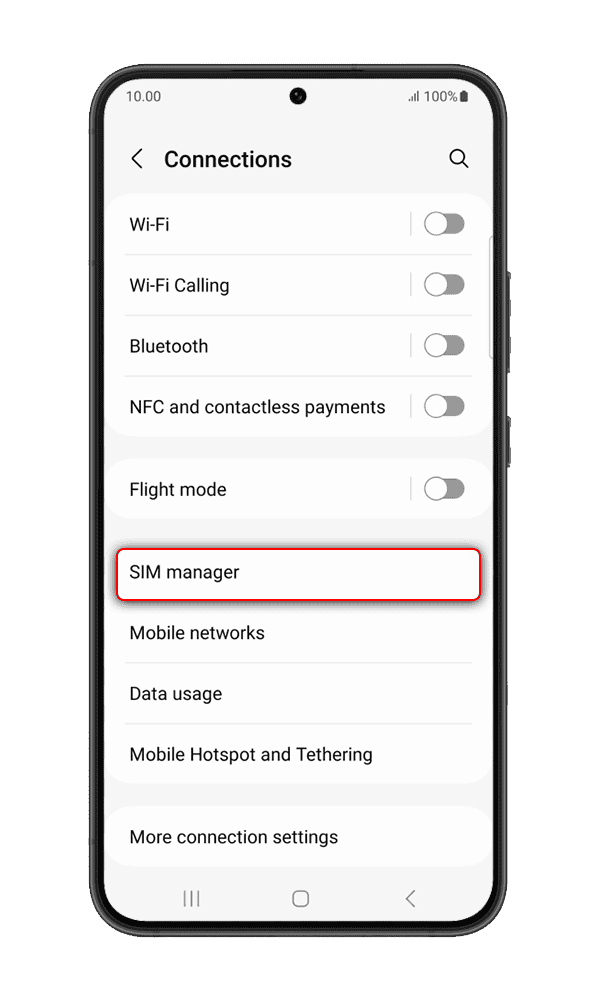
Step 2: Select Sim Manager
-
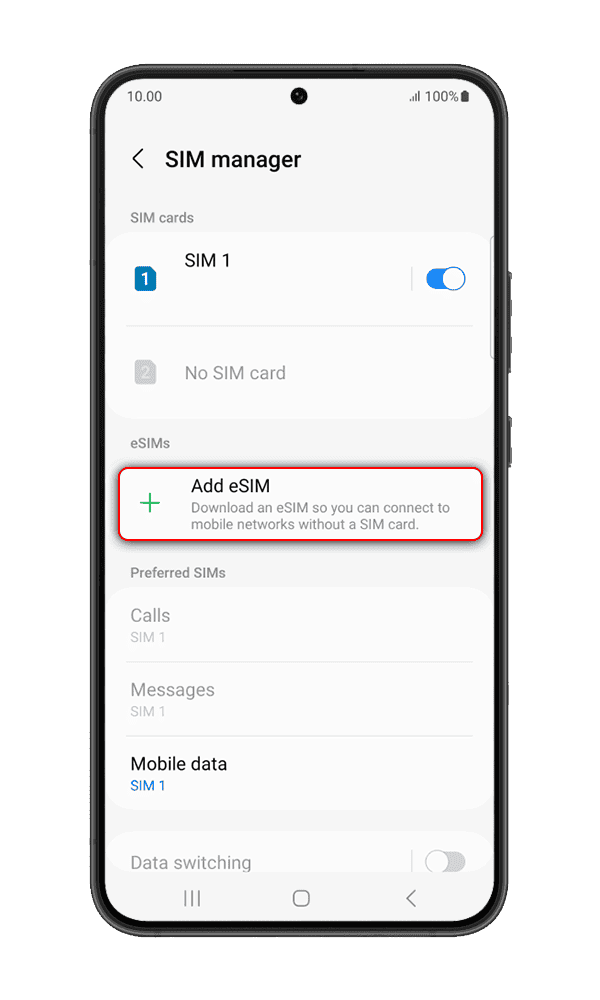
Step 3: Select Add eSIM
-
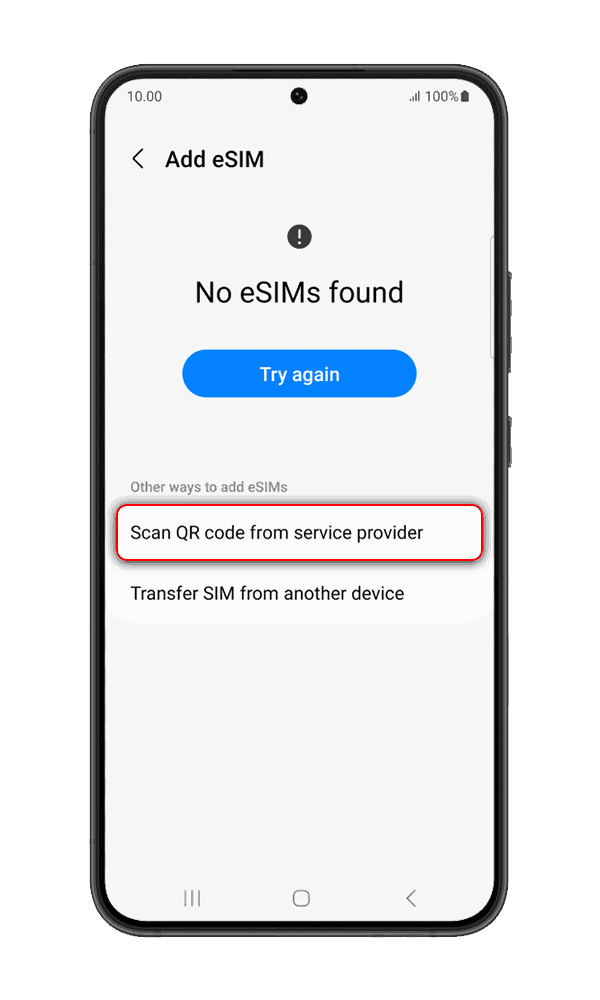
Step 4: Scan the QR code and label it as eSIM1 (or any other name)
-
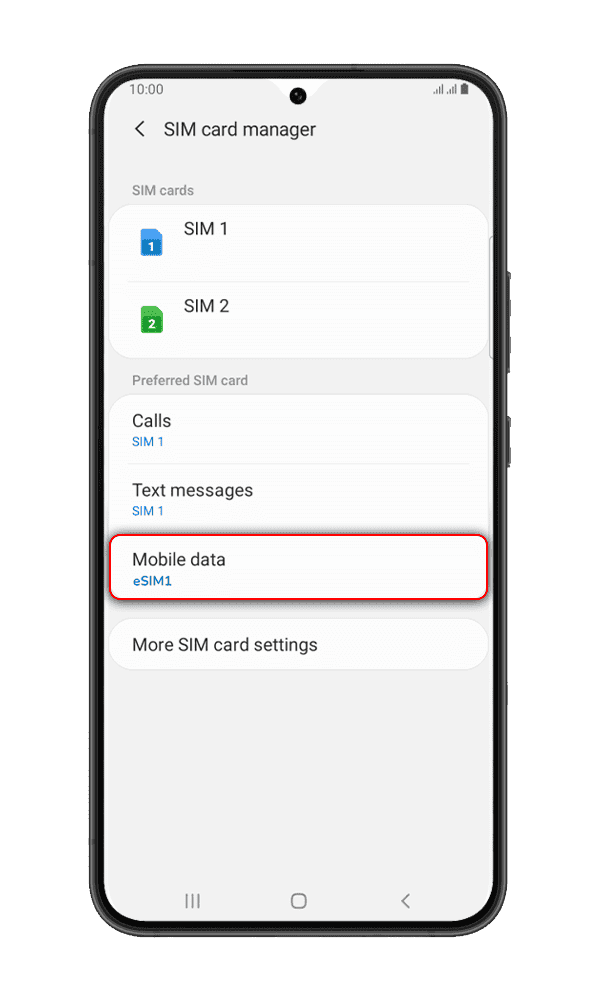
Step 5: Click on Mobile data > Select eSIM1
-
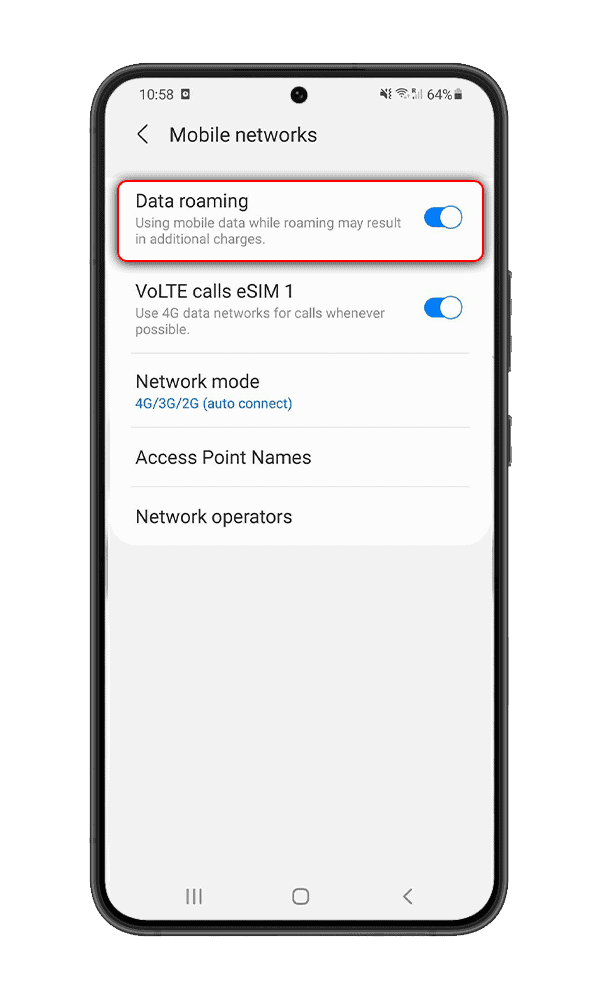
Step 6: Back to Connections > Mobile Networks > Turn on Data roaming
3. eSIM on GOOGLE PIXEL
Add an eSIM
Settings > Network & Internet > Add new SIM >
Download a SIM instead
Install the eSIM via QR code
Scan the QR code that you receive in your email.
Name your eSIM
Once the eSIM has been downloaded, it’s automatically
named as SIM2.
Turn on the eSIM
Settings > Network & Internet > Downloaded SIM
> Use SIM
Set the eSIM for Mobile data
Select the eSIM (usually labeled SIM2) for data,
or go to SIM2 and turn on Mobile data
Turn on Data Roaming of the eSIM
Select the eSIM (usually labeled SIM2) > turn on Data roaming
Check if you need to change your APN Settings
Changing your APN allows you to access mobile data. Some phones don’t start auto-set up of the APN,
so you need to make it manually. The APN details are given to you along with the eSIM QR code on your email.
-
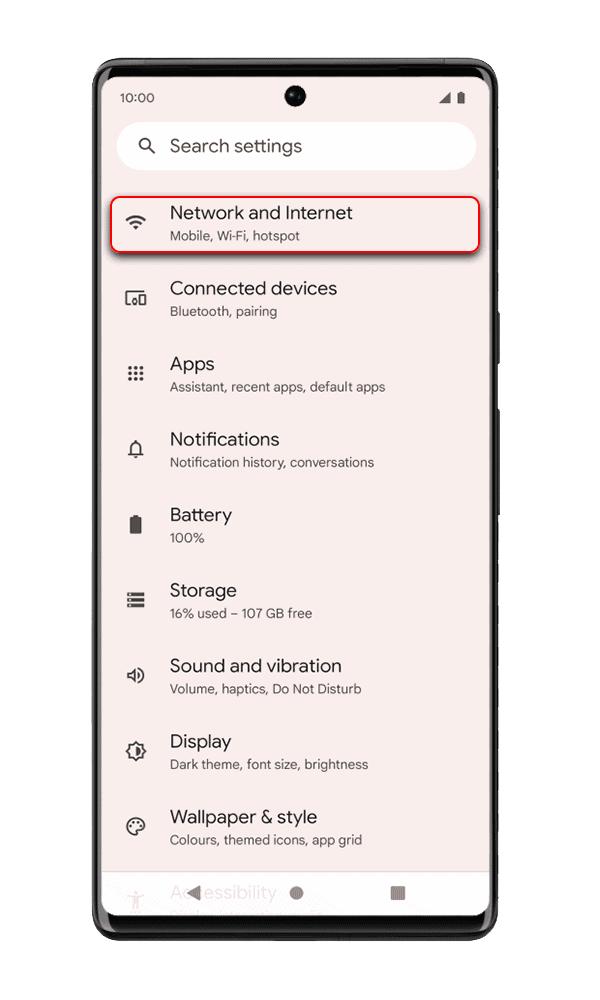
Step 1: Go to Settings > Network & Internet
-
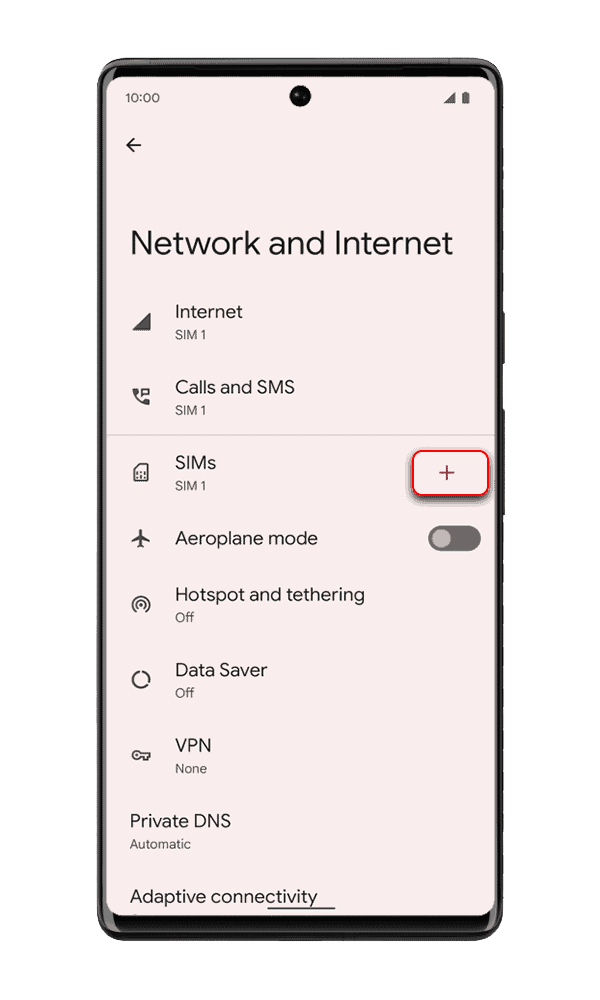
Step 2: Click on the + button to add new SIM
-
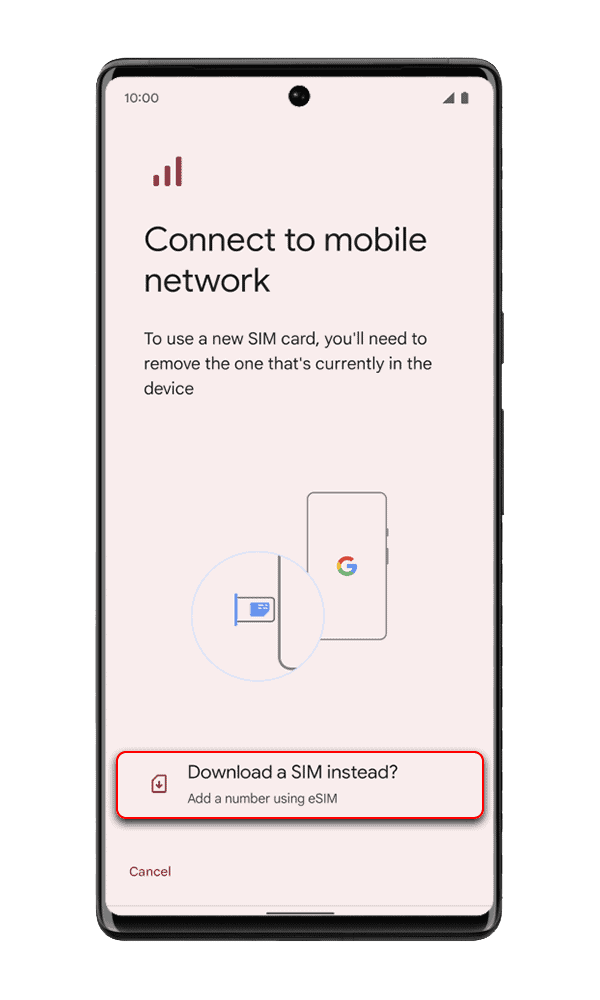
Step 3: Select Download a Sim instead
-
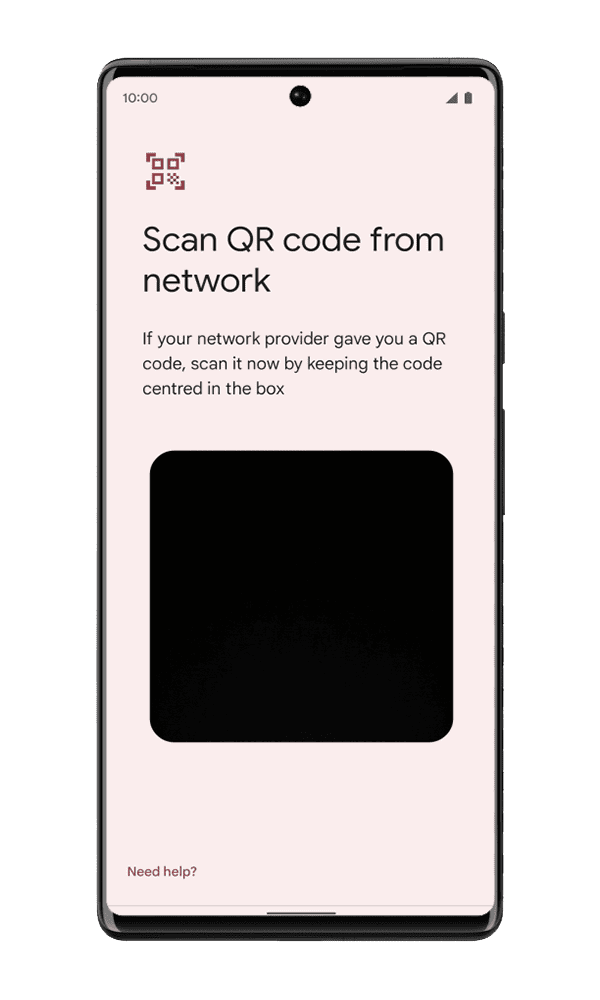
Step 4: Scan the QR code and it’s automatically labeled SIM 2
-
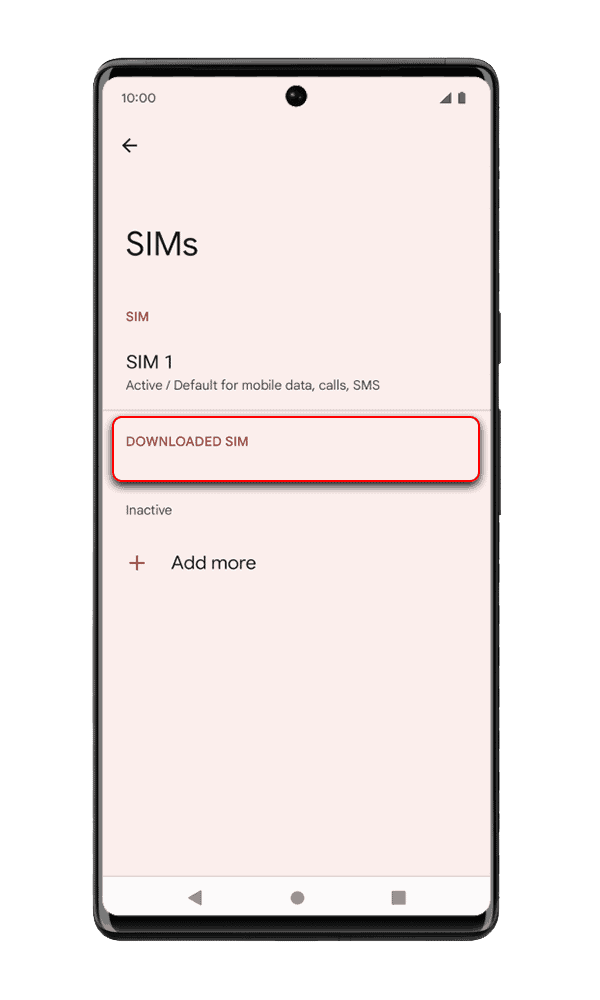
Step 5: Select Downloaded SIM
-
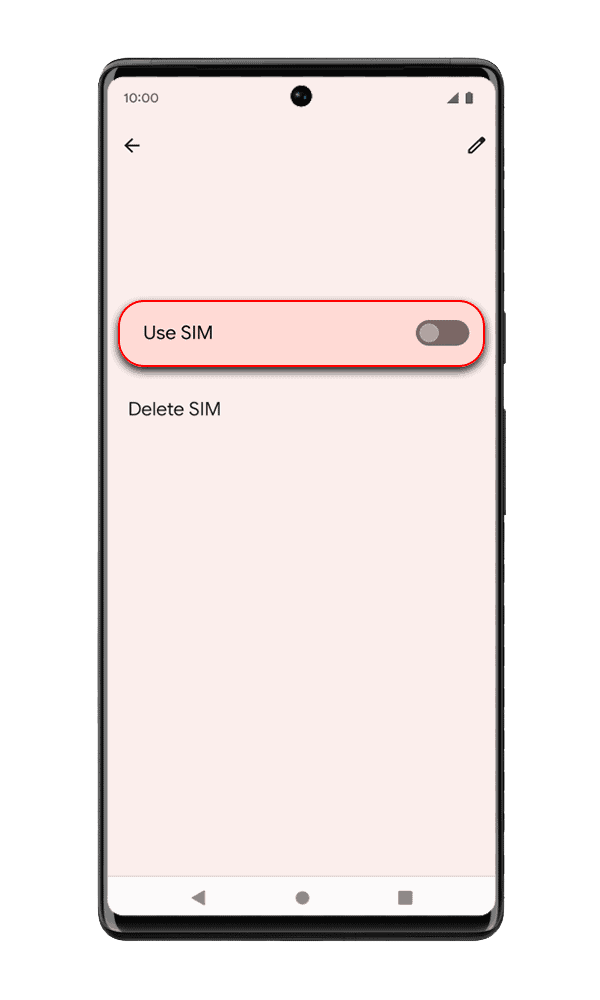
Step 6: Slide to Use SIM
-
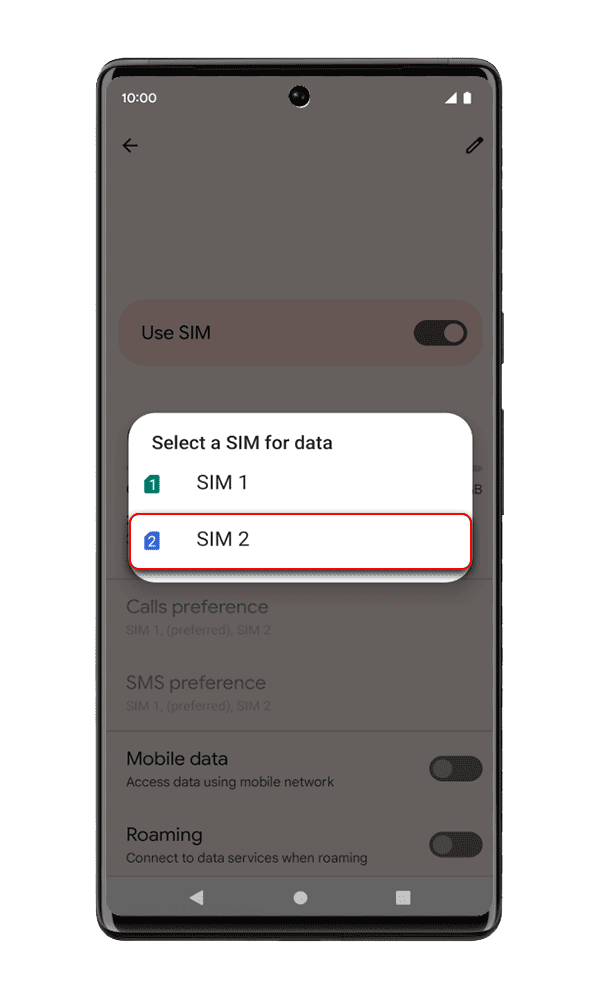
Step 7: Select SIM2 for Data
-
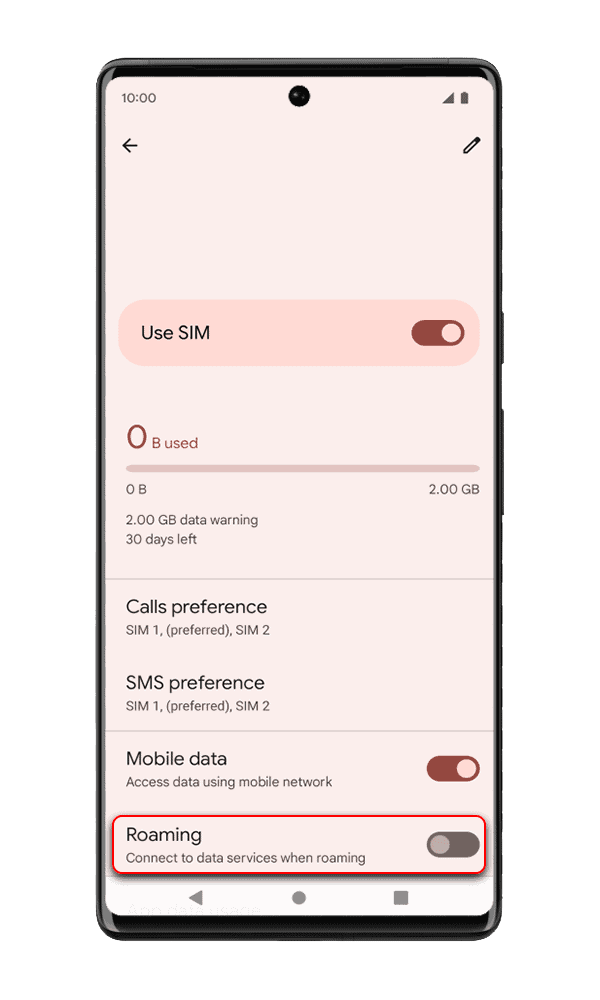
Step 8: Turn on Roaming
You will receive it immediately to your email address once you finish the purchase process on our website. You then just need to scan the QR code to activate the SIM.
Your plan starts the moment you activate your eSIM by scanning the QR code on your smartphone.
Most of the devices produced from 2020 are compatible with the Travel eSIM, including, but not limited to: Apple iPhone SE (2020), XR, XS, XS Max, iPhone 11 series, 12 series, 13 series, 14 series, Samsung S20, S20+, S20 Ultra, Samsung S21 models, Samsung S22 models, Galaxy Z Flip, Galaxy Z fold, Note 20 models, Fold LTE, , Huawei P40, P40 Pro, Google Pixel 3, 3a, 4, 4a, 5, 6, 7 and Motorola Razr 2019. Some iPad models are also compatible (Pro 11 and 12,9 inches 3rd generation, iPad Air 3rd generation, 7th generation, and Mini 5th generation), and the Apple Watch Series 4. Make sure your smartphone is unlocked (i.e. not tied to a specified mobile provider).
You need get your phone connected to wifi during installation of the eSIM because the phone has to download the eSIM’s profile by scanning the QR code.
Some eSIM only allow you to use mobile data, some provide you both mobile dataI and phone calls and text messages. Check carefully the description of each eSIM’s package.
You don’t need to do anything to keep your WhatsApp number. You’ll automatically keep your number, contacts and conversations.
Our Travel eSIM offers maximum speed coverage (4G/ LTE). But bear in mind that in some areas of limited coverage there may be a lower speed connection. Most of our eSIM plans offer unlimited low speed at 128kbps, 256kbps, or 384kbps, so you can enjoy unlimited internet accesss even when you finish the maximum speed data.
Yes, you must turn on data roaming of your Travel eSIM on your mobile settings.
No, you must not delete the eSIM once it’s been installed successfully. eSIMs can only be installed successfully one time. You should check your phone settings and make sure it’s done correctly following our instructions. You can also contact our 24/7 customer support team at help@travel-esim.net or our online chat function.
You need WiFi to set up your eSIM so we recommend that you install and activate your eSIM just before your departure. You can also wait until you arrive in the country to activate the eSIM, but remember that you need WiFi connection for the set-up process.
After your purchase, we will send a QR code to your email. Either print the QR code to a paper or open it on your computer or another device. On your cell phone, go to Settings > Cellular > Add eSIM (on iOS) or Settings > Connections > SIM Card manager > Add mobile plan (on Androids) and scan the QR code. Your phone will allow you to assign a specific name to this data plan. The travel data plan will only be operational once you arrive at your destination. Once you land, on your phone settings, turn on data roaming of the Travel eSIM. Also, on Cellular Data (iOS) or Mobile Data (Androids), you must select the Travel eSIM so that it will be used for data.
Yes, you can use your SIM card and your Travel eSim at the same time. Choose the Sim card for phone calls and SMS, and Travel eSIM for data from your device. Please remember that if you leave your Sim card activated, your network provider may apply data roaming charges to receive or make phone calls as well as SMS.
At the moment, you cannot renew the data on your Travel eSIM. However, you can purchase another eSIM if you need more data.
Not all eSIM allow you to share data with other. Please refer to the detailed description of each eSIM to know if it has this function or not.
You can check how much data you have by going to your device’s data settings. Another way is to install an App to track your data usage. Some examples are: Data Usage, DataMan, My Data Manager VPN Security, etc.
Your eSIM can only be activated on one device. If you delete the eSIM from your device, you will not be able to reuse it. You cannot scan the QR code either on two devices or two times on one device.
Because eSIMs are digital product, they are certain to work properly if you correctly follow the instructions and have the right set up on your phone. But in case of any technical issue occurs to our eSIM, we can offer you a refund. To get the refund, you must send us the ICCID/ series number of the eSIM and some screenshots to show the problem on your phone. For more information, please see our eSIM Refund Policy.
The eSIM will connect to the best available network in your destination. So, depending on which area you are in, you might see a certain network. This network may be switched when you move to another area. You can see the list of available networks of each eSIM in its description.
Be the first to review “Israel eSIM 5 days highspeed 4G/LTE” Cancel reply


Reviews
There are no reviews yet.